Bring the Old Windows Taskbar to Life in Windows 7
Microsoft's latest operating system, Windows 7, brings a slew of tweaks
and improvements. While most adjustments are under the hood, the
graphical user interface has received a facelift as well. One of the
first changes you will notice is the revamped taskbar. Unofficially
dubbed the "Superbar," this new feature is essentially a mash-up of the
traditional Windows Quick Launch/taskbar and the Mac OS X dock.

As it's often the case with any significant change in the way we use
software, opinions will vary. While many like to stick to the "if it's
not broken, don't fix it" philosophy, I happen to like the new taskbar a
lot. Unfortunately for the those of you who don't, defaulting to the
ways of old isn't as simple as unchecking Superbar in favor of Quick
Launch, so you'll have to get a little hands-on. Keep reading to bring
back the taskbar you're familiar with.
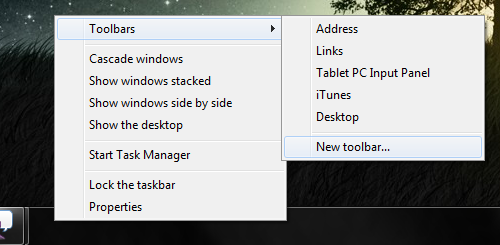
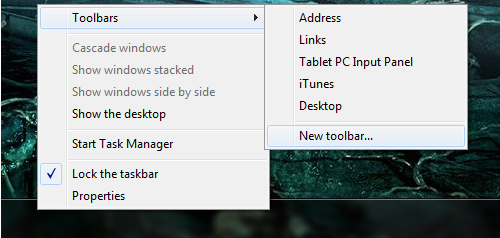
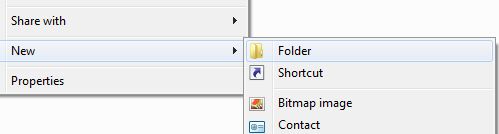
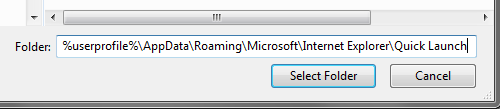
Start by right clicking the Superbar, mouse over Toolbars and click New toolbar. When prompted to enter a folder directory, paste the following string of text:
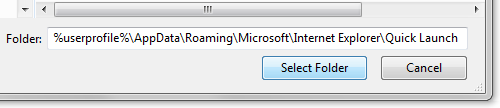
%userprofile%\AppData\Roaming\Microsoft\Internet Explorer\Quick Launch
Then click Select Folder.
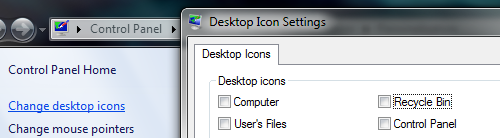
A labeled Quick Launch bar should appear near the clock.
To configure the Quick Launch bar to how it was in previous versions of Windows, you'll have to make a few swift changes. Start by right clicking the Superbar and unchecking Lock the taskbar. You should see a few dotted lines appear near the Quick Launch bar.

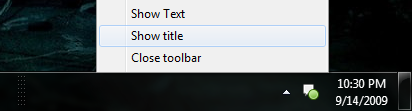
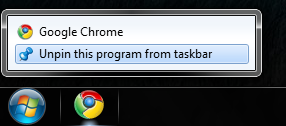
Next, right click on the Quick Launch bar, uncheck Show text, and Show title. Then you'll need to right click on all your Superbar icons and unpin them.
Grab the dotted lines near the Quick Launch bar and pull it all the way
to the Start button. By doing so, the bar where your applications load
will be bumped near the clock - so pull those dotted lines back to the
left near your Quick Launch bar.

Now, your open applications will still be using Windows 7's small
collapsed buttons instead of the long text-filled ones. To change that,
right click on the Superbar and head into Properties.
Click the drop down menu next to Taskbar buttons and choose either of the last two options. When you're done, click Ok and recheck Lock the taskbar.

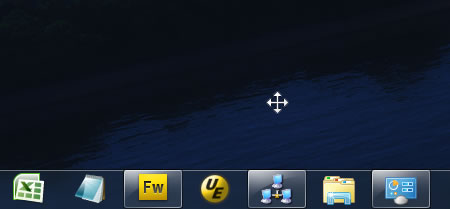
The finished product should look something like this:

Did you know?
Microsoft first introduced a taskbar with Windows 95. Its design remained largely unchanged until the modifications seen in Windows 7.
Credit from: http://www.techspot.com/guides/188-old-taskbar-in-windows7/
%userprofile%\AppData\Roaming\Microsoft\Internet Explorer\Quick Launch
Then click Select Folder.
To configure the Quick Launch bar to how it was in previous versions of Windows, you'll have to make a few swift changes. Start by right clicking the Superbar and unchecking Lock the taskbar. You should see a few dotted lines appear near the Quick Launch bar.
Click the drop down menu next to Taskbar buttons and choose either of the last two options. When you're done, click Ok and recheck Lock the taskbar.
Microsoft first introduced a taskbar with Windows 95. Its design remained largely unchanged until the modifications seen in Windows 7.
Credit from: http://www.techspot.com/guides/188-old-taskbar-in-windows7/